Windows generic name for alprazolam Modules Installer Worker High CPU is one of those common errors that you might face at the time of using your Windows 10 device like many other users. And like most of the users, you can also face the problem if the Windows Modules Installer Worker of your device tool causes high CPU use and becomes nonresponsive. If the problem comes to you, then it can frustrate you a lot. But fortunately, you can easily fix this technical glitch on your Windows 10 device with the help of some easy and helpful solutions we are going to describe in this article. So, read the article thoroughly and try to resolve your issue as fast as possible.
Windows Modules Installer Worker and Functions in Brief
Windows Modules Installer Worker is one of those built-in Windows Operating System tools that help the users to check for updates whenever they need. With the help of this tool, Windows 10 Operating System can update itself without any hiccups along with that it can fix the bugs.
And at the time of performing its task, Windows Modules Installer Worker runs a high disk usage process in the background. In response, there is a chance for your device to become utterly slow and it can even become completely nonresponsive.
Why is it Using so Much CPU?
As per our knowledge, when it comes to the Windows Modules Installer Worker, the high CPU usage is quite normal. But you don’t need to worry about this as if you allow it to run, then eventually the process will end and stop using CPU and disk resources. The working time of the process depends on the speed of the CPU and storage of your computer device. Along with that, it depends on the fact that how many updates are there to be installed.
How to Fix Windows Modules Installer Worker High CPU in Windows 10
If you are experiencing a sluggish behavior of your computer or the CPU is getting lots of loads then it can happen because of the Windows Modules Worker Installer. It happens due to the necessary window updates on a regular basis.
And, this action puts a lot of loads on CPU that causes Windows Modules Installer Worker high CPU in Windows 10. However, you can easily fix this problem with ease with the help of some easy steps. Read on to know the fixes.
Solution 1: Fix Windows Modules Installer Worker by Running Window Update Troubleshoot
You can resolve the problem by following the upcoming steps one by one accurately:
- First of all, open Settings by pressing Windows Key + I and then hit the icon Update & Security.
- Now, you have to Troubleshoot that you can find in the left-hand menu and then hit Windows Update that placed under ‘Get up and running’.
- Now, find the ‘Run the troubleshooter ’under Windows Update and then hit it.
- After that, wait for a while and give the troubleshooter some time to run. It is able to fix any issues found with Windows Update automatically.
Solution 2: Manually Check for Windows Updates
If the previous method fails to work properly then you can try this one to get rid of the issue.
To check for Windows Updates manually you need to follow these steps:
- First of all, press Windows + I keys simultaneously and then choose Update & Security.
- After that, for once again you have to hit the option ‘Check for updates’ and ensure that you have installed every pending update.
- After the completion of the installation of all the updates, you need to Restart your PC. And now, check if the issue persists on your device till now.
Solution 3: Configure Windows Update to Manual
Note: Before performing this solution you should remember that this Solution will switch Windows Update to manual, from automatically installing the new updates. That means, to keep your PC secure, you have to manually check for Windows Update. But, you can again set the Updates to Automatic after resolving the error by following this Solution.
Also Read :- Fix Application Not Responding In Windows 10
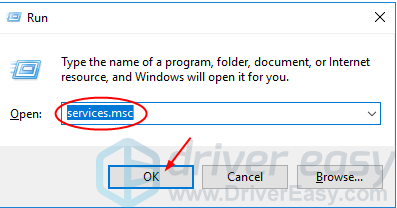
- First of all, to start the process you need to invoke the Run dialog box. And to do so, you need to press Windows Key + R on your keyboard simultaneously. Then again, you need to type in the command ‘services.msc’ in the Run box and then press Enter key.
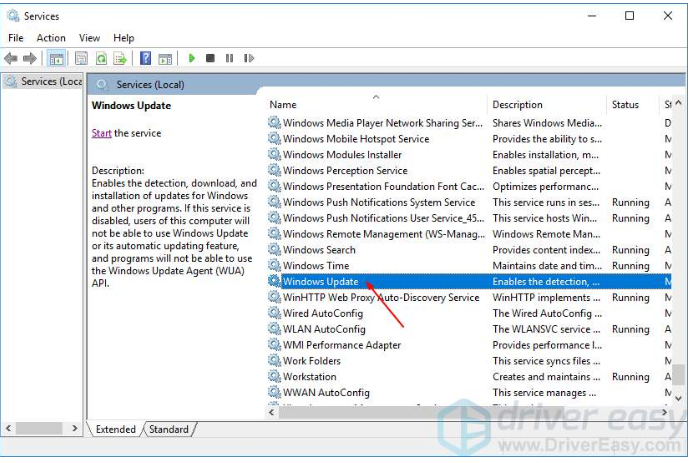
- After that find Windows Modules Installer service in the appeared list by scrolling it down.
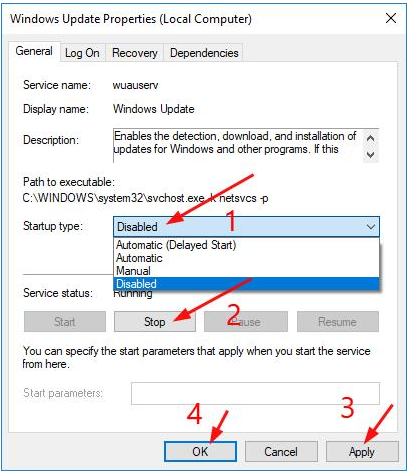
- And then, you need to select Properties after right-clicking Windows Modules Installer service.
- Now, you have to hit the option ‘Stop’ along with that you need to choose the option named Manual from the Startup type drop-down.
- Once you are done with that, hit Apply and then OK.
- And for the Windows Update service, you can follow the same step.
- Then, Restart the PC to save changes.
- Here, also you need to check for Windows Update Manually and then install the pending updates if there any.
- After finishing the task you need to go back to services.msc window and open the Windows Modules Installer & Windows Update Properties window to continue the process of fixing the issue.
- Now, you need to set the Startup type to Automatic. After that, hit the Start option. Once you are done with that hit Apply and then OK.
- Restart your PC to save changes and check after the completion of the Restart program if the problem has resolved or not.
Solution 4: Run System Maintenance Troubleshooter
If you are stuck in the same problem till now, then follow the upcoming steps.
- First of all, to start the process again you have to invoke the Run dialog by pressing Windows Key + R. And there in the Run box type control and press the Enter key. Then, the Control Panel will open before you.
- There you need to search the option ‘Troubleshoot’ and then hit it.
- Then, you will find View all in the left pane. Hit it.
- Now, you have to run the System Maintenance Troubleshooter. To do so hit the option ‘System Maintenance’.
- This will be able to Fix Windows Modules Installer Worker High CPU Usage smoothly. But still, if you find that it failed to do so, then you need to run System Performance Troubleshooter.
- To do so, open the Menu by press Windows Key + X simultaneously and then from the list choose Command Prompt (Admin).
- Now, you need to type the command ‘msdt.exe /id PerformanceDiagnostic’ excluding the inverted commas into cmd and press Enter key.
- And then, to complete the task you need to follow the on-screen instruction and run the troubleshooter and let it fix the issues if there any.
- In the end, exit the cmd and restart your PC and check if the error has resolved or not.
Also Read :- DNS Server Not Responding Error
Can you End Windows Modules Installer Worker?
If you still are stuck to the problem after performing all the above steps, you can end the process if you want. To do so, follow the upcoming steps accurately:
- First of all, you need to go to Task Manager. For that, you have to press Ctrl+Shift+Esc keys simultaneously.
- And there, from the list of processes find Windows Module Installer Worker (TiWorker.exe).
- And then, after locating it you need to Right-click on it and from the appeared new menu select the option ‘End Task.’
- Now, you are done with the ending of the process.
The Misconceptions Regarding Windows Modules Installer Worker
Sometimes, many people think that the process is malware disguising itself as the Windows Modules Installer Worker or TiWorker.exe but it is not. As the process is itself a part of Windows. But still, if you are suspecting something wrong about it then you can run an antivirus scan using your preferred antivirus software.
The Process of Enabling Windows Modules Installer
If you want to enable Windows Module Installer on your PC and want to restore your PC into the original version at the same time then follow the next steps:
- At first, go to the Task Manager and then go to Services.
- There, you will find the option ‘Open Services Button’ in the bottom. Click on the option.
- And then, from the appeared list, find and locate the Windows Modules Installer Worker and then right-click on it and go to the Properties of the option.
- Now, you have to select an Automatic option that you will find in the Startup type field. Once you are done, hit the option OK and complete the task.
Conclusion
Hope the above steps mentioned in the article have helped you to fix the problem. Thanks for visiting us and stay connected to us to get more effective articles that can help you at the time of using your electronic gadgets. Along with that, you can also place a comment in the comment section saying whether you liked our article or not.