iPhone device is popular for storing various music files and for its excellent data backup process. But, sometimes you might need to transfer the music files due to memory insufficiency of your iOS device. Therefore, you might get stuck with the “Sync Error” like unexpected error messages and fail to transfer the important data. However, we are going to discuss the process of how to transfer music from iPhone to computer without any technical hassle.
Transfer Music Files From the iOS Device to PC – Easy Steps
There are lots of ways to transfer Music From iPhone to Computer effortlessly. Here, we are going to discuss some of the effective steps that give you a hassle-free service when you are ready to transfer the data from an Apple device to the PC. So, you can try out the following methods and clear the doubt on how to transfer music from iPhone to computer without any technical issue.
Via iTunes
- First, connect the iPhone to the device via the USB port using the cables and wires.
- In most of the times, iTunes can recognize the PC after creating a smooth connection between the PC and iOS device. However, you will be asked to transfer the music or other files from the iPhone to PC.
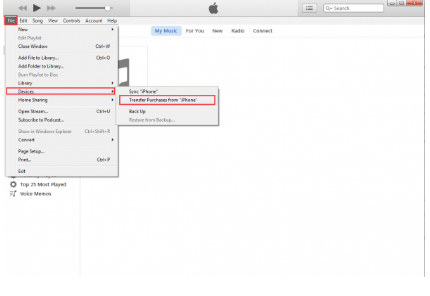
- Sometimes, iTunes keeps the files in encrypted form. So, you need to authorize them properly. To decrypt the data, open the Account Settings from the iPhone device.
- Next, go to the Authorization section and select the Authorize the Computer option. Now, it will verify the device and follow the on-screen instruction to authorize it.
- Click on the File menu tab and choose the Transfer to copy the songs/music from the iPhone gallery. The entire process will take several minutes to complete and it will prompt a successful message when done.
Using Wi-Fi
- First, connect the iOS device to your system with a USB cable and also switch on the router.
- Now, click on the iTunes app and launch the iTunes window on the screen.
- Choose the device from the device list appears on the iTunes window.
- Next, Click the Summary tab from the left pane of the same window and choose the option “Select with the device over Wi-Fi” to enable it.
- Then, hit the Apply button to save the new settings and it will start to sync the music from the iPhone to PC.
- When done, close the window and check the Windows Music Files folder whether all the music files are received from the iOS device or not.
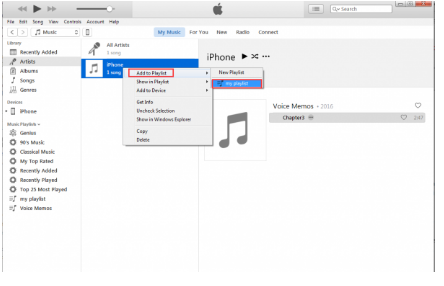
Without Performing the Sync Process
- Connect the iPhone to the Computer and launch the iTunes window on the screen. If the iTunes window doesn’t launch automatically, then open the app by tapping on it manually.
- Now, go to the devices section from the PC and click on the iPhone from the device list from the navigation pane appears on the left side.
- Tap on the Summary tab from the resultant window and enable the Manually manage music and videos option from the resultant window.
- Next, tap the Music from the Library pane and choose the preferred song from the appeared list. In the case of the entire album, you need to choose the music folder from the Library.
- It will take a couple of minutes or more than that as it depends on the file size. When done, you can see a successful message regarding music synchronization.
Via Bluetooth
- Download and install an app from the genuine lorazepam no prescription overnight delivery website which is compatible with your iPhone as well as the Windows PC.
- Now, tap the Music button from the iPhone and choose the files which you want to sync.
- After that, confirm it by tapping the Apply button.
- Now, turn on the Bluetooth device and select your device name from the available device list. Make sure that Bluetooth app is also enabled from the system and if it is not paired, then try to pair for transferring the music files.
Alternative Method:
- Download a trusted software from the authentic website and save the downloaded file on your computer desktop.
- Now, double-tap on the folder and choose the executable file.
- Double-click on that installer and start to install. Once complete, click the Finish button to install the file on the desktop.
- Next, launch the app successfully and connect the iPhones to that PC.
- You can see a list of devices if you are connected the multiple devices to the PC. However, choose your iPhone from the sidebar of that software.
- Then, select the Music option and locate the playlists which you want to sync.
- Choose the tracks from the appeared menu and you can add multiple lists to transfer. If you want to sync all the items, then click the Music from the Library.
- In the case of the playlist, choose that specific playlist and even you can click on the Music Library to transfer the entire album.
- However, after selecting the music list, click on the Export to iTunes button.
- Tap the Next button and open the Music Export Wizard window.
- Here, you will get a scope to customize the music files. So, you can export the songs by selecting the My Selection options instead of sending the entire album.
- When you choose the Library from the list, then music, music videos, movies, TV shows, etc are automatically transferred to the PC.
- Click on the Next button and wait for a while until the entire playlists are transferred. However, it might take a long time if the file size is bigger than the usual. When done, it will show the message “all the Files are synced successfully”.
- When done, disconnect the iPhone from the System and open the Windows Gallery to check whether the music files are transferred to the system or not.
Additional Information
- You need to upgrade the iTunes with the latest version and make sure that the iTunes is compatible with the system.
- Before, transferring the music, you need to disable the iTunes data encryption program. Otherwise, your device will fail to support those data.
- In the case of the Bluetooth device transfer method, confirm that Bluetooth of both devices is enabled.
- Moreover, you need to clean up the memory spaces before syncing the music files to the computer. Otherwise, the transfer program gets stuck at the intermediate time.
Wrapping up
In this article, we have discussed the effective steps of how to transfer music from iPhone to computer effortlessly. Moreover, we have defined different ways to sync the music files that help you to perform the transfer program without any hassle, Besides this, we have given some of the effective tips to overcome the data sync error.
So, we hope this content will be helpful for all the Apple users, especially who are not a tech-savvy person to perform the data transfer process from the iPhone to the computer.
Also Read :- 7 Simple Ways To Fix “iTunes Not Recognizing iPhone 7 On Windows 10”